Backup ubuntu server and restore
We are going to learn how to take a full backup of Ubuntu server from the current state and restore it to another server.
So you don't have to reconfigure the new server for example apache/Nginx, MySQL setup, and so on. Just backup and restore.
We can do it easily by tar command. Here I am discussing step by step-
1. Backup Ubuntu server
2. Restore it in the target server
3. Reconfigure grub for boot
Let's start -
Backup Ubuntu server
Go to your command line and connect with the server by ssh. now go to root folder by
cmd: cd /
Now write the following command to create a backup file
cmd: tar -cvpzf backup.tar.gz --exclude=/backup.tar.gz --one-file-system /
To understand what is going on, we will dissect each part of the command.
tar - is the command that creates the archive. It is modified by each letter immediately following, each is explained below.
c - create a new backup archive.
v - verbose mode, tar will print what it's doing to the screen.
p - preserves the permissions of the files put in the archive for restoration later.
z - compress the backup file with 'gzip' to make it smaller.
f - specifies where to store the backup, backup.tar.gz is the filename used in this example. It will be stored in the current working directory, the one you set when you used the cd command.
--exclude=/example/path - This command doesn't include defile file/folder. We don't want to backup everything since some directories aren't very useful to include. The first exclusion rule directs tar not to back itself up, this is important to avoid errors during the operation.
/ - After all options are the directory to backup. Since we want to backup everything on the system we use / for the root directory. Like exclusions, this recursively includes every folder below root not listed in the exclusions or other options.
So we completed our backup.
Let restore it. Login to your target server by ssh. Go to root folder by
cmd: cd /
Upload the backup file here and type the following command to restore -
sudo tar -xvpzf backup.tar.gz -C / --numeric-owner
Here,
x - Tells tar to extract the file designated by the f option immediately after. In this case, the archive is /home/test/backup.tar.gz
-C - This option tells tar to change to a specific directory before extracting. In this example, we are restoring the root (/) directory.
--numeric-owner - This option tells tar to restore the numeric owners of the files in the archive, rather than matching to any user names in the environment you are restoring from.
Restoring GRUB
Now we need to fix grub. You can get unique UUID and boot location by running following command-
blkid
Take the UUID from the output and replace in /etc/fstab and /boot/grub/grub.cfg
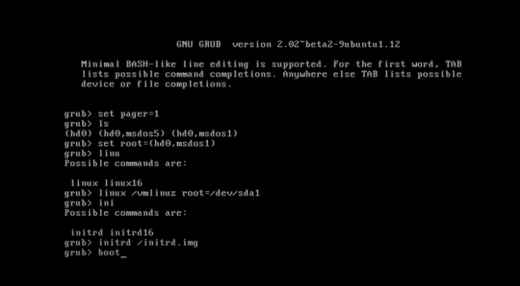
Now reboot. You should successfully reboot. If you get an error and the terminal show
grub> then execute following command-
cmd: set payger=1
cmd: ls (you will get an output like (hd0), (hd0,msdos1) )
cmd: set root=(hd0,msdos1)
cmd: linux /vmlinuz root=/dev/vda1 (I have vda1, so enter whatever yours. You can get it from blkid command)
cmd: initrd /initrd.img
cmd: boot
You should successfully reboot the server. Now login and you may want to update grub by the following command-
cmd: sudo dpkg-reconfigure grub-pc
Just continue its default value.
If you still get error and terminal says
(initramfs) > then run following command-
fsck /dev/vda1
and reboot.
So we finished our restoring our backup.
If you are a beginner you may not understand all steps. If you face any problem comment below. I'll try to replay.


